

This article walks you through connecting your WooCommerce store with your Gist workspace, syncing your WooCommerce customers in Gist, and pushing orders, carts, and products.
You can start automating your email marketing based on the actions your customers take in your WooCommerce store. Did someone make a purchase? Abandon a cart? View a product? Use WooCommerce events like these to trigger workflows and other rules that help you stay as engaged as possible with your customers throughout the entire purchase cycle.
The Gist and WooCommerce integration bridges the gap between your e-commerce activities and marketing efforts.
- Setup your WooCommerce and Gist integration
- Sync your WooCommerce historical data to Gist
- Analyze your WooCommerce data in Gist
- Segment contacts based on their products
- Automate e-commerce campaigns
- Frequently asked questions
1. Setup your WooCommerce and Gist integration
In order to set up the WooCommerce Deep Data integration and sync customers, products, orders, and abandoned cart data into your Gist workspace, you will need to configure the integration in three places in the following order:
- Your Gist workspace
- The Gist for WooCommerce WordPress plugin
- The Marketing Automation by Gist WordPress plugin (optional)
Step 1: Connect your Gist workspace to your WooCommerce store
First, we will connect your Gist workspace to your WooCommerce store.
- In your Gist workspace, go to Apps & Integrations page.
- Look for the WooCommerce integration from the list of apps and select it.
- Click on the Install button in the popup that appears.
- Enter your Store's WooCommerce URL and click Connect to WooCommerce.
- In the pop-up window, enter your WooCommerce credentials and authorize the connection.
You should now see a message indicating that your WooCommerce store has been connected to Gist.
Step 2: Install the Gist for WooCommerce plugin
Next, we will install the Gist for WooCommerce WordPress plugin.
- Login to your WooCommerce admin dashboard.
- Navigate to Plugins > Add New and search for the “Gist for WooCommerce” plugin.
- Install and activate the plugin.
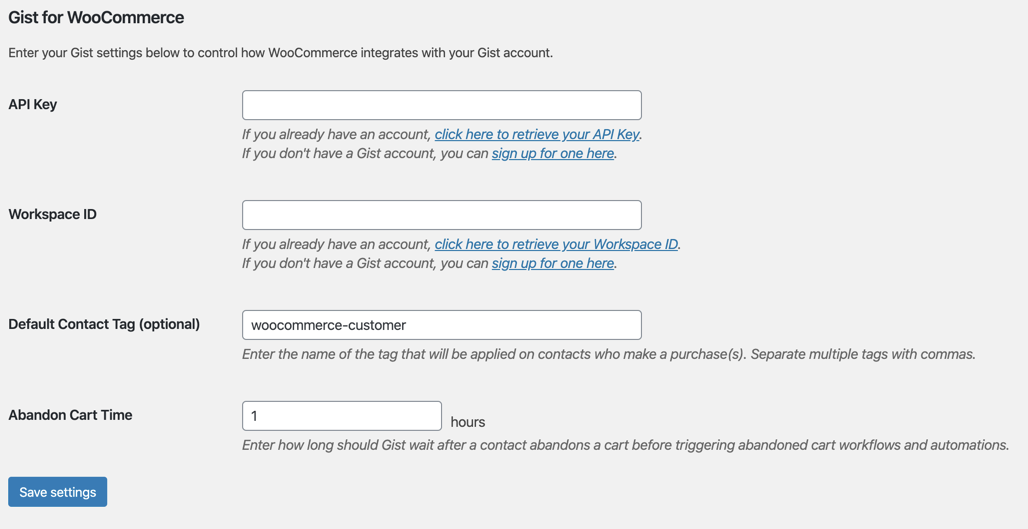
- Go to the plugin’s settings page and enter the API key and Workspace ID of the workspace you want the store to connect to.
- Click "Save settings".
Step 3: Install the Gist WordPress plugin (optional)
To ensure complete integration and to add Gist tracking code to all of your WooCommerce store pages, it is recommended that you install the Gist WordPress plugin.
Detailed instructions on how to install and configure this plugin are available in our Gist WordPress Plugin Installation Guide.
Once you have completed these steps, your WooCommerce store will be connected to your Gist workspace. All WooCommerce customers for whom you have an email address will be added as a new contact inside your Gist account. We’ll ensure their subscription status in Gist matches the preferences set in your WooCommerce store for future communications.
2. Sync your WooCommerce historical data to Gist
After successfully connecting your WooCommerce store to Gist, you can easily manage the connection through your Gist account by navigating to 'Settings > Integrations'.
Synchronizing Historical Data
Post the Gist and WooCommerce integration setup in both your Gist workspace and the Gist for WooCommerce plugin, new data (products, customers, orders, and abandoned carts) will be automatically synchronized in real time. However, past customer and order data will not be fetched automatically.
To sync your historical data, follow these steps:
- Navigate to Apps & Integrations page in your Gist workspace.
- Look for the 'WooCommerce' app from the list and click 'Sync Historical Data' button.
Upon activating this sync, your WooCommerce store's historical data will be imported, which comprises:
- All the customers and their respective orders.
- Customers who have never placed any orders.
- Orders made by customers already present in your Gist workspace.
The sync operation will proceed in the background, allowing you to close the page or continue with other tasks. It's important to note that previous abandoned cart data will not be synchronized, and the 'Made a purchase' trigger will not activate any workflows or rules for the synced historical data.
Disconnecting the integration
In case you decide to disconnect the link between your WooCommerce store and Gist workspace, you can easily do so by:
- Navigating to Apps & Integrations page.
- Search and select the WooCommerce app
- Click the Uninstall button.
Simultaneously, don't forget to also deactivate or uninstall the Gist for WooCommerce plugin on your WordPress admin dashboard.
Any data already pulled from that WooCommerce store will not be deleted and will remain even after the store has been disconnected.
3. Analyze your WooCommerce data in Gist
Upon completing the initial data transfer from WooCommerce to Gist, you will be able to access and analyze all of your WooCommerce Products, Customers, and Orders right inside your Gist workspace.
Customer Data
All your WooCommerce customers will be synchronized as contacts in Gist, using their email addresses for unique identification. This synchronization process entails the following:
If a contact with the same email doesn't already exist in Gist, a new one will be created using the information from the corresponding WooCommerce customer.
If a contact with the same email already exists, their Gist profile will be updated using information from the WooCommerce customer, provided that the corresponding properties in WooCommerce contain valid data.
The properties that are synchronized between WooCommerce customers and Gist contacts include:
- Sign-up date
- First and last names
- Email and phone numbers
- Order-related details (e.g., total orders, total revenue, total products)
- Most recent order data (e.g., date, price, currency, product count)
- Last abandoned cart data (total value and product count)
- Tags
- Location (city, country, state/province, and zip code)
Order Data
WooCommerce orders, once synced to Gist, will appear in the respective contact's profile and activity timeline. Each order will be associated with a product(s) and customer. The following properties are synced between WooCommerce orders and Gist orders:
- Various identifiers (e.g., abandoned checkout URL, customer ID, cart token)
- Order status details (e.g., cancelled at, created at, financial and fulfillment statuses)
- Order sources (e.g., landing site, referring site, source name)
- Order pricing details (e.g., currency, subtotal price, total discounts, total line items price, total price, total tax)
- Other order properties (e.g., order name, note, order number, processing method, total weight)
4. Segment contacts based on their products
Customize your customer engagement strategy by segmenting your Gist contacts according to their product preferences and order status. Here's how you can do it:
Create Product-Based Segments
You can tailor your contact segmentation according to the products or categories they've purchased. For example, creating a segment for customers who have bought 'Product X' or products from 'Category Y'. You can even focus on purchase frequency, like customers who've bought 'Product X' thrice in the past six months.
Such segments allow you to send highly targeted, relevant emails in line with your customer's interests, further enhancing their shopping experience.
Segments Based on Order Details
Define your segments using detailed order information. For instance, you could create a segment of customers who've placed two orders within the past 30 days, each ranging from $50 to $100, or customers who've purchased goods worth $150 in the last year.
This segmentation strategy allows you to identify high-value customers and cater to them with personalized messaging.
Find Customers by Product Variant
Experiencing a stock surge of a particular size of sweatshirt or shoes? Create segments of customers who've previously added these specific sizes to their carts. Inform them about the available items they're interested in, perhaps even offering a discount. It's an effective way to clear out surplus stock.
Kickstart with Default Segments
To get you started, we offer five predefined e-commerce segments. Here's what they include:
- Customers with 0 Purchases - Where "Total orders" equals 0
- First Time Customers - Where "Total orders" equals 1
- High Spending Customers - Where "Total revenue" is $500 or more
- Repeat Customers - Where "Total orders" equals 5 or more
- High Spending Repeat Customers - Where "Total orders" equals 5 or more, and "Total revenue" is $500 or more
These segments serve as a starting point for personalized customer engagement, ensuring you make the most out of your WooCommerce data in Gist.
5. Automate e-commerce campaigns
With WooCommerce's integration with Gist, you can create automated workflows to connect with customers and streamline your e-commerce campaigns. Here are some key features:
Made a Purchase
This trigger, available after connecting your e-commerce store from the Integrations page, automates processes whenever a customer completes a purchase. Here are some potential uses:
Review Request Workflow: Automate the process of collecting product reviews.
- Initiate a workflow triggered by a new purchase.
- Send an email 7-21 days post-purchase asking for a review (considering your average fulfillment and delivery times).
- Follow up with a second review request email after another 7-day wait period if no action has been taken.
- Insert a 'Goal with a Jump' condition to avoid sending the second email if the customer responds to the first.
- Enable the "Run multiple times" option to retrigger this workflow for every new purchase.
Customer Appreciation Workflow: Show gratitude towards your regular customers.
- Create a custom field for the date of a customer's first purchase.
- Schedule an appreciation email to be sent annually on the anniversary of their first purchase.
Abandoned a Cart
Abandoned carts are potential sales lost when a customer leaves your store before completing their purchase. Here's how you can address this:
Abandoned Cart Recovery Workflow: Encourage customers to complete their purchase.
- Set up the "Abandoned a Cart" trigger to activate a workflow when a cart is abandoned.
- Customize the trigger to track specific WooCommerce products, product categories, and cart values.
- Use advanced searches to identify contacts who abandon or recover their carts and more.
With these automated workflows, you can enhance customer experience, streamline campaign operations, and boost conversions.
6. Frequently asked questions
Will Gist track contacts that get synced from WooCommerce?
Yes, contacts that get synced after the integration has been set up will be automatically tracked in Gist right after the sync.
Is it necessary to manually add the Gist tracking code to my WooCommerce store pages?
No, there is no need for that. Once you install the Gist WordPress plugin, it will automatically embed the Gist tracking code into all of your WooCommerce store pages.
What occurs when I delete a WooCommerce product, customer, or order?
Deleting customers, orders, or products in WooCommerce does not remove the corresponding records in Gist. They remain intact in your Gist database.
What will happen if I delete Gist contact records created via WooCommerce?
Even if you delete Gist contacts that were originally created through WooCommerce, the corresponding customer records in WooCommerce will not be deleted. Also, if those records are updated in WooCommerce, they won't be recreated in Gist unless you do a full historical sync again.
How does Gist identify when an order has been abandoned at checkout?
An order is marked as 'Checkout Abandoned' in Gist if it is created in WooCommerce but isn't completed within the timeframe defined in the Gist for WooCommerce plugin. After this time, the order status transitions from 'Checkout Pending' to 'Checkout Abandoned'.
Can I use Gist to send invoice emails for WooCommerce?
Currently, Gist does not support sending WooCommerce invoice emails or other transactional emails for completed purchases. The purpose of the WooCommerce integration is primarily to facilitate marketing activities in Gist, while transactional activities are to be managed within WooCommerce.