

Gist meetings is an online scheduling tool used by thousands of happy customers to create one-on-one scheduling pages so leads can book meetings with ease.
Your contacts can access these scheduling pages using a meeting link. If you connect your Gmail of Office 365 calendar, scheduled meetings will sync with your connected calendar so your appointments will always be up-to-date.
With Gist meetings, you can:
- schedule 1:1 meetings with automatic calendar invitations and reminders
- automatically sync meetings with your favorite Calendar apps, GSuite, and Outlook365
- connect up to 6 calendar accounts to check real-time availability
- change your profile and meeting link to match your brand - set a background image or color
- setup exactly how and when you are available
- request contact information from participants such as email addresses, mailing addresses, or phone numbers
- embed your meeting links to your website for a seamless scheduling experience
- reduce cancellations and no-shows by allowing customers to reschedule with one click
Getting started
We’ve put together a few simple steps for you to set up your account and book your first meeting. This should take about 10 minutes.
We’ll walk you through the following steps:
🏗 Account setup
- Set up your profile
- Connect your calendar
- Add video conferencing
🗓 Scheduling setup
- Edit your meeting link
- Set your availability
- Share your link
Let’s jump in!
Step 1: Set up your profile
Let's head over to your Settings > Your Preferences > Profile & calendar page.
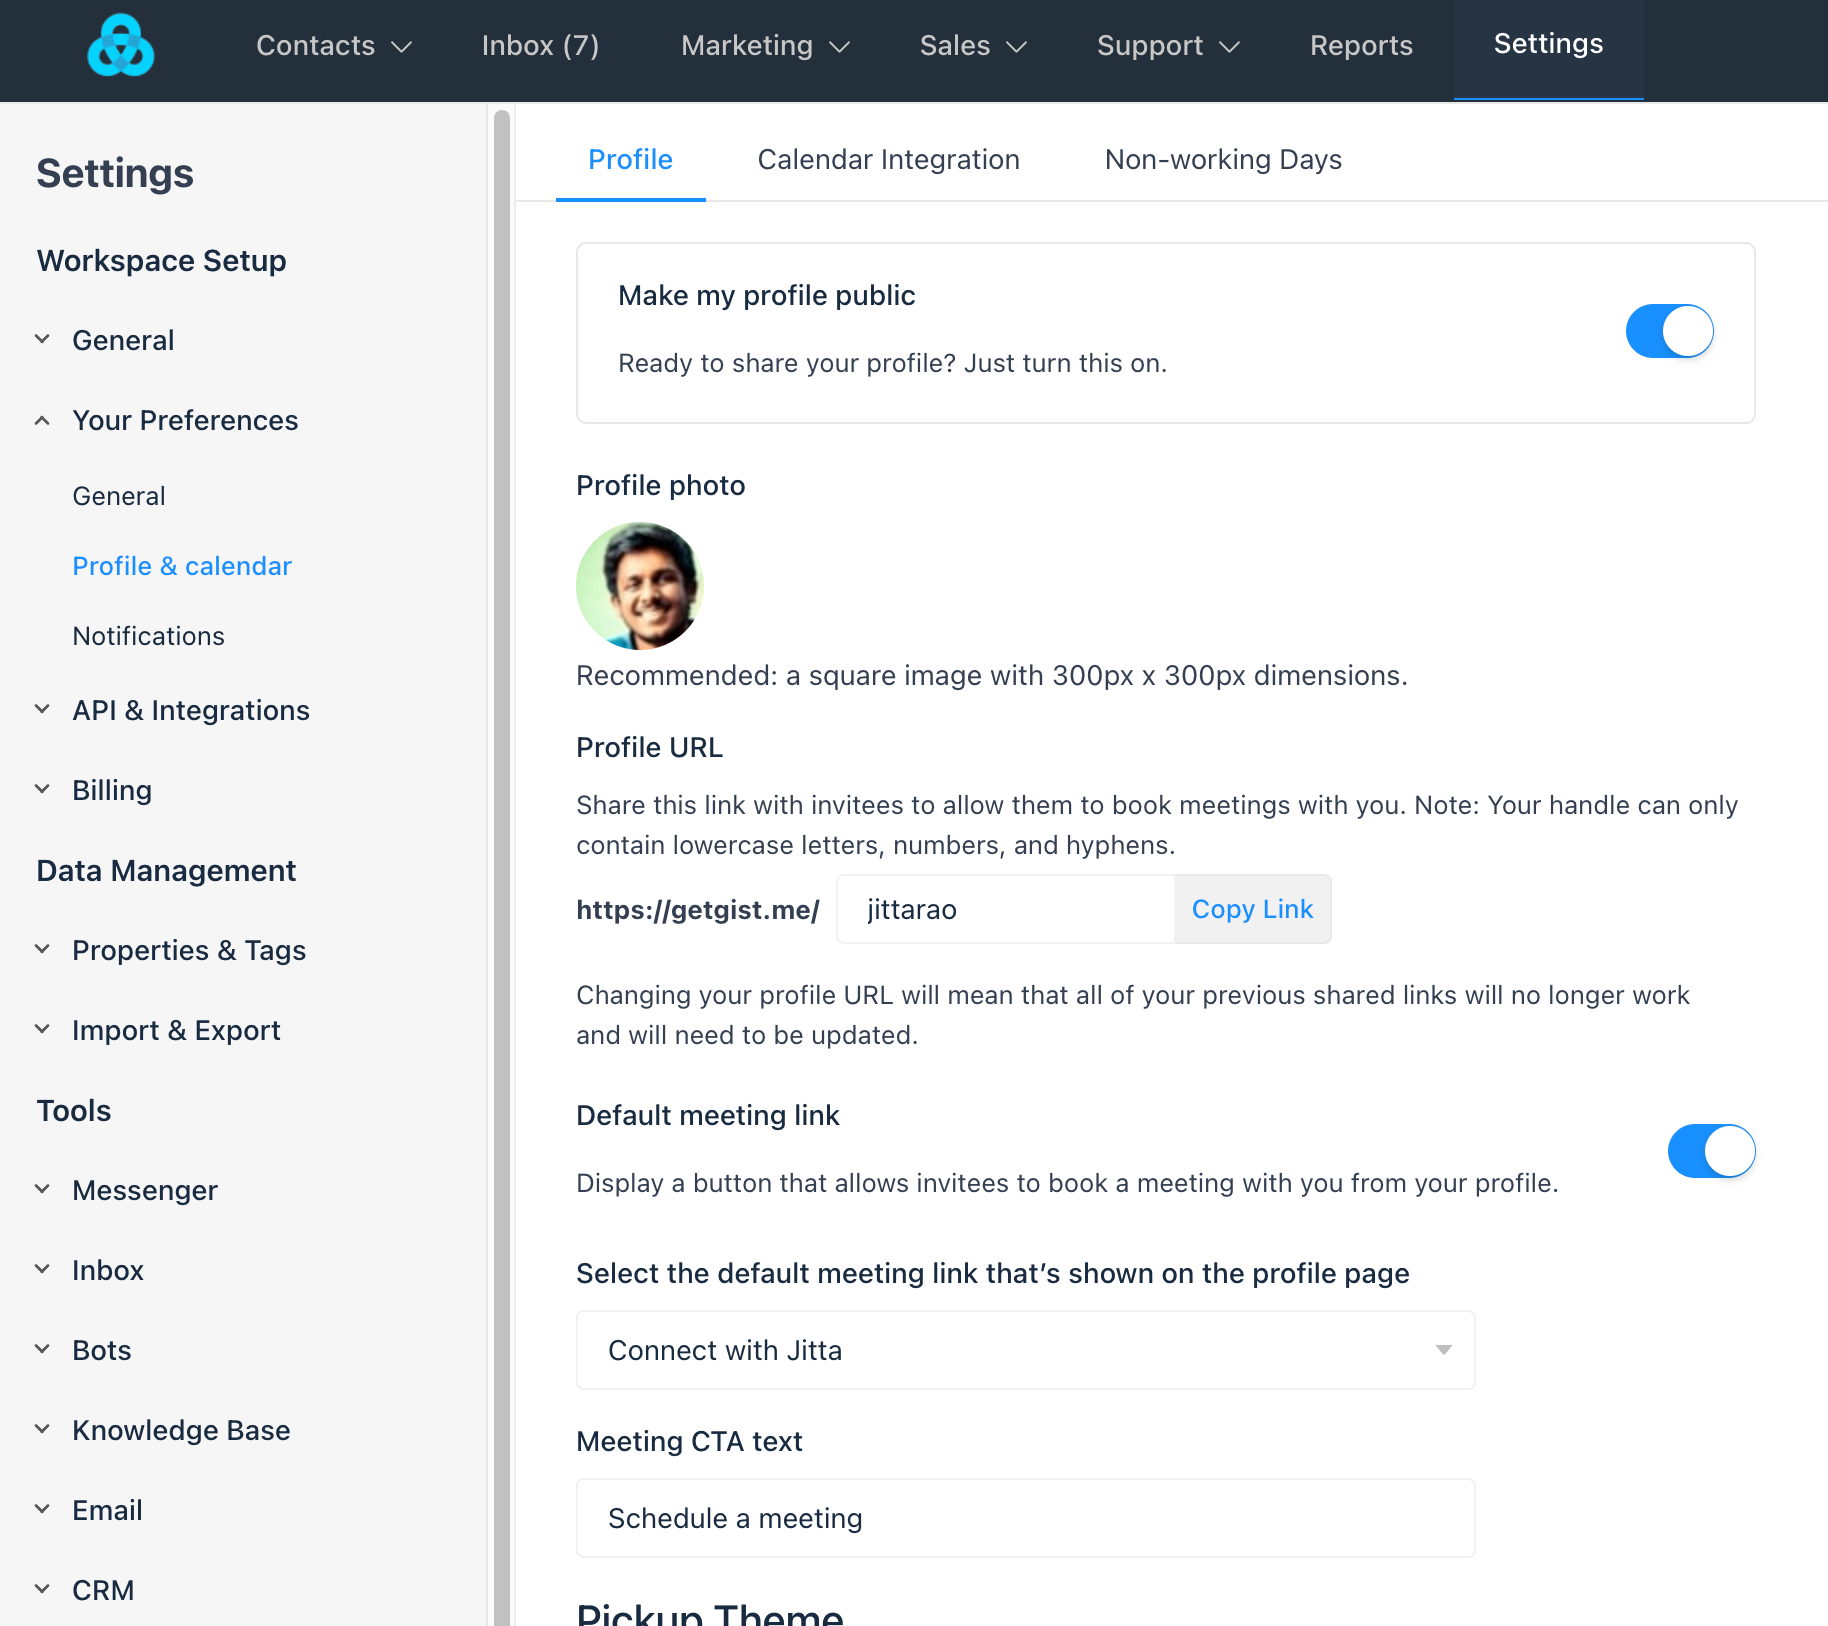
Your Gist profile
This is the unique link that will lead to your profile. We recommend making this short and personalized!
We also recommend setting this once and not changing it. If you've shared your profile link and then you change it, the old link will break!
Fill in the the Title, Location, and Short bio fields accordingly with information about your position and interests!
Theme
You have two options for the theme of your profile. On the left, one that is based on a card, and on the right, one that puts your avatar front and center in a two-column style!
Details & Social
You can personalize your profile, so your invitees can learn more about you. You can think of your profile page as a first introduction.
To make the intro go smoothly, you can update your photo, name, your bio and social links.
Making your Profile Public
Whenever you're ready to make your profile public, switch on the toggle at the top of the page within the "Make my profile public" section.
Step 2: Connect your calendar
Connecting your calendar is a key part of scheduling. When you connect your calendar, Gist will automatically check your busy time slots and make sure that meetings never get double-booked for you.
To connect your calendar, navigate to your Calendar Integration tab on the Settings > Your Preferences > Profile & calendar page.
Here, you’ll connect your main calendar. If you already see a calendar connected, you may have already connected a calendar during your sign-up process.
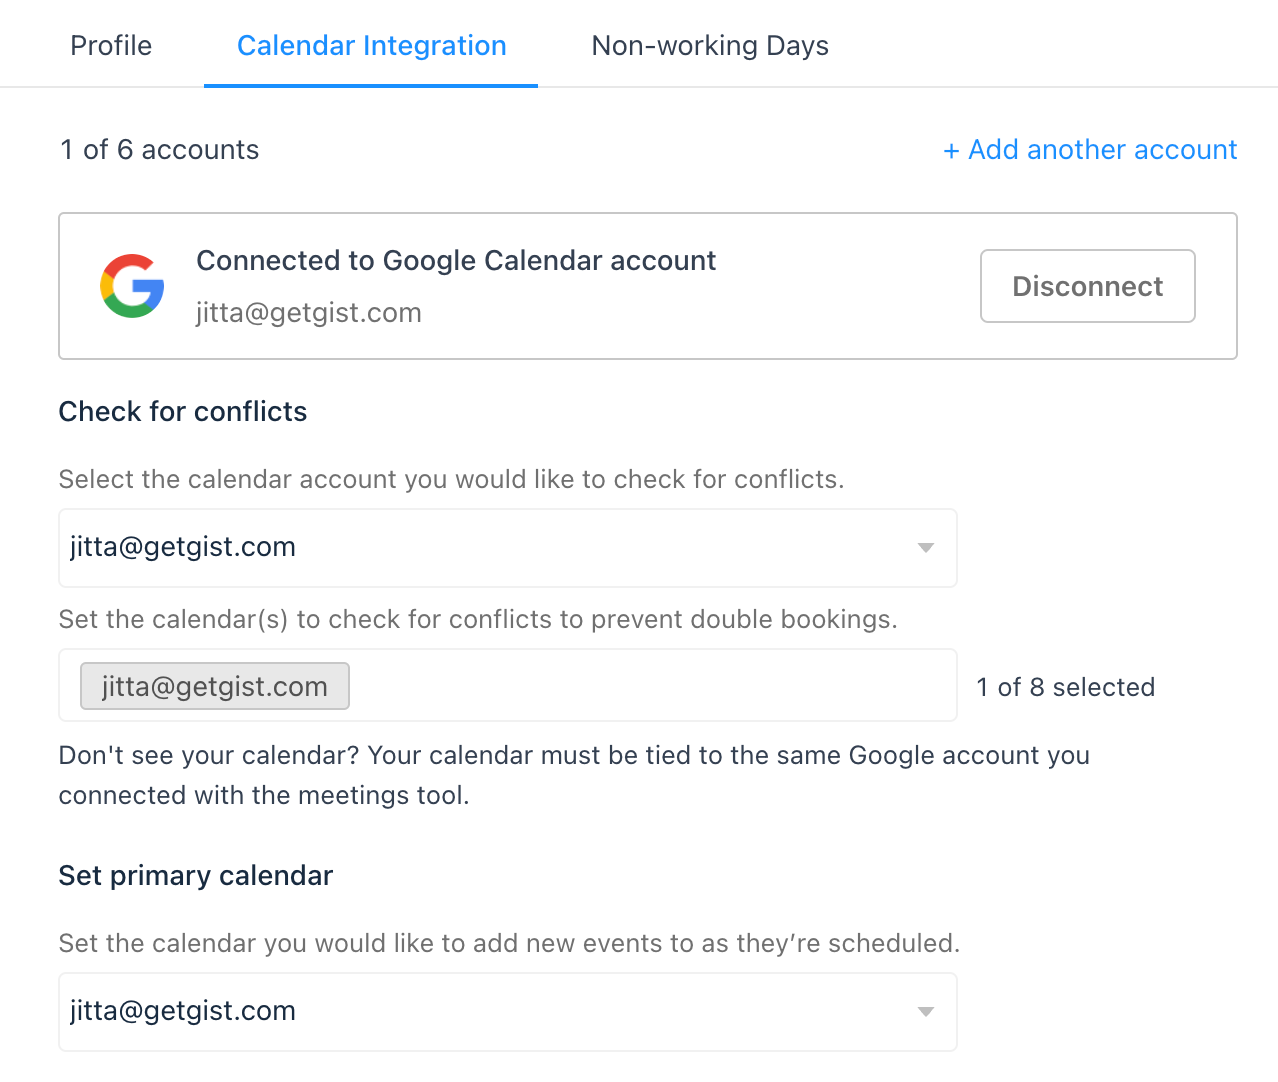
Note that while you can connect multiple calendars, Gist can only add events to one calendar. You can choose which calendar that is under Set primary calendar.
With your calendar connected, Gist will now only display times when you’re free on your meeting page.
Step 3: Add video conferencing
By connecting your Zoom account to Gist, you can reduce the time you spend manually sharing Zoom details. Upon scheduling, Gist will automatically generate a unique Zoom link and dial-in details.
To connect, on the Integrations page, select Zoom and log in.
Once connected, you’ll also need to choose video conferencing as your location in your meeting links, but we’ll also go over that in the next step.
For now, know that your designated Gist meetings will automatically include a unique link with your video conferencing details.
Step 4: Setup your meeting link
A meeting link corresponds to a type of meeting you'd like to schedule, and you can create as many links as you'd like.
For example, a sales representative might create two meeting links, one for sales discovery meetings, and another for product demo meetings. The sales rep can tailor each link to the type of meeting that's being scheduled. For example:
Link 1: Sales Discovery Meetings
Monday and Tuesday between 1pm and 5pm
Location: Phone call at 123-456-7890
Link 2: Product Demo Meetings
Wednesday and Thursday between 9am and 4pm
Location: Zoom conference
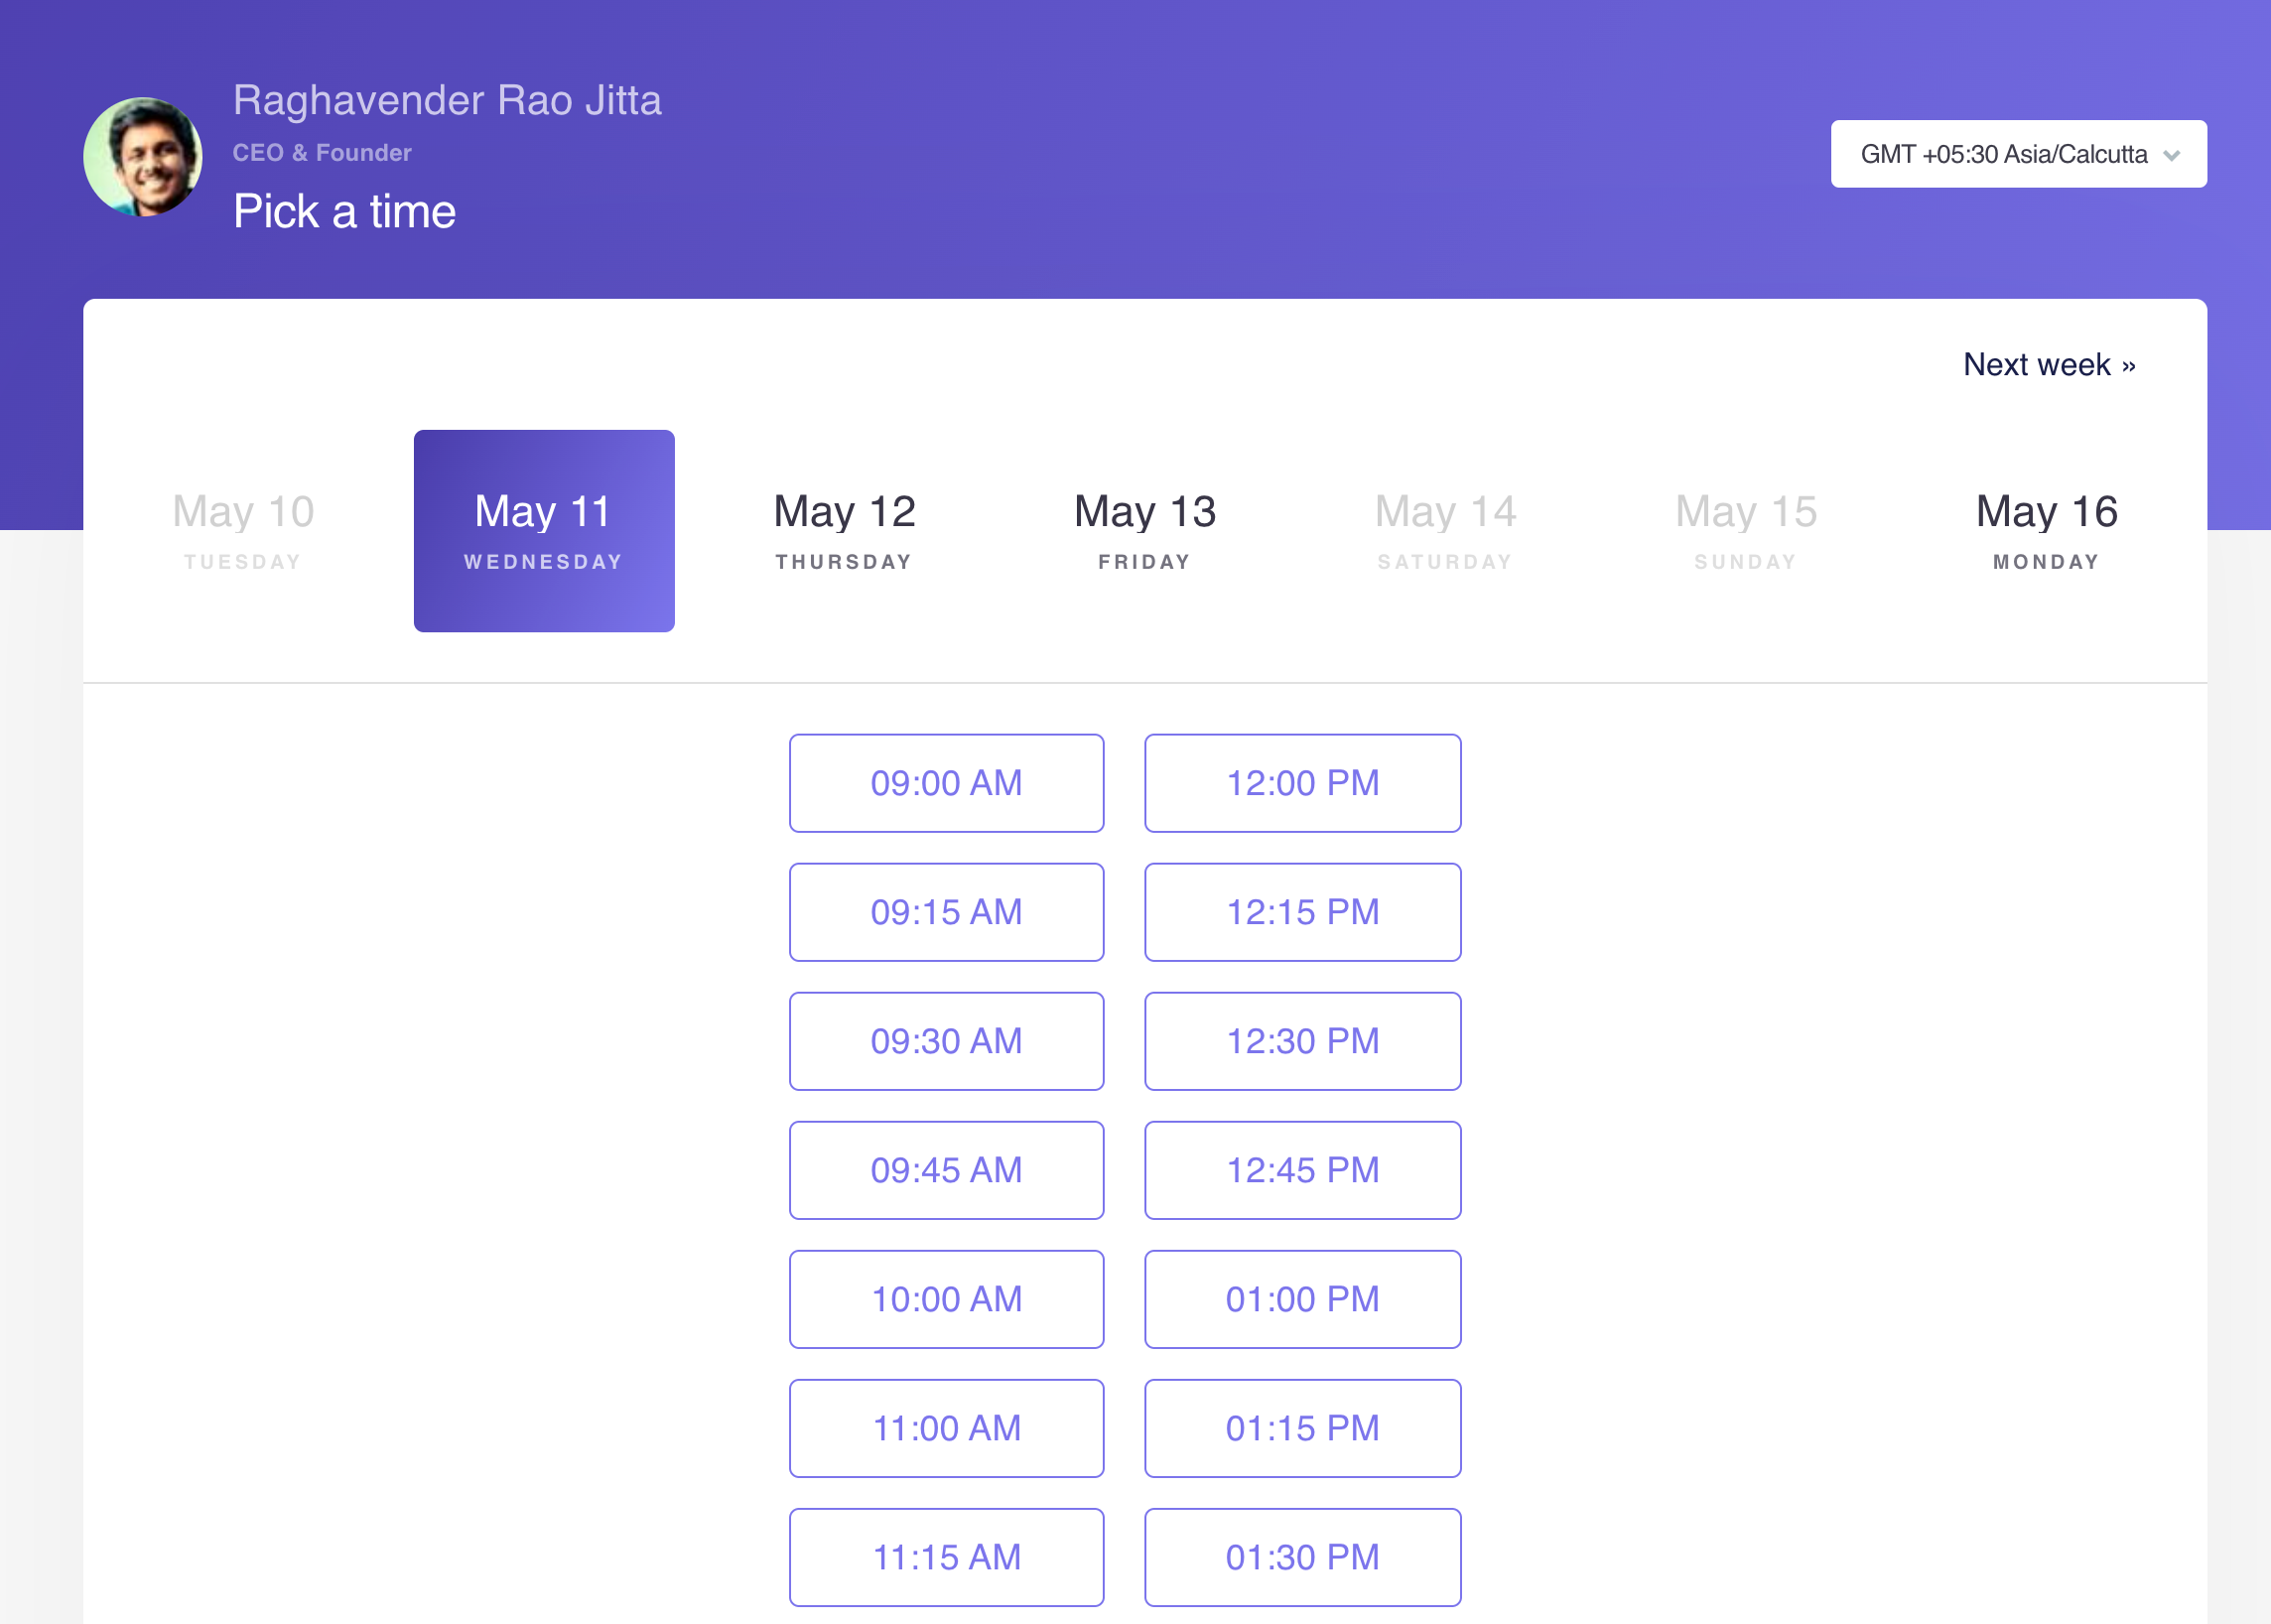
After creating a meeting link, you can send its URL to anyone to allow them to schedule a meeting with you! They'll see a booking page like this:
On your Sales > Meetings page, you’ll notice a pre-built meeting link with a set duration.
Let’s go ahead and edit this to meet your scheduling needs.
To edit an existing link, click on the meeting link and continue setting up by following the steps below.
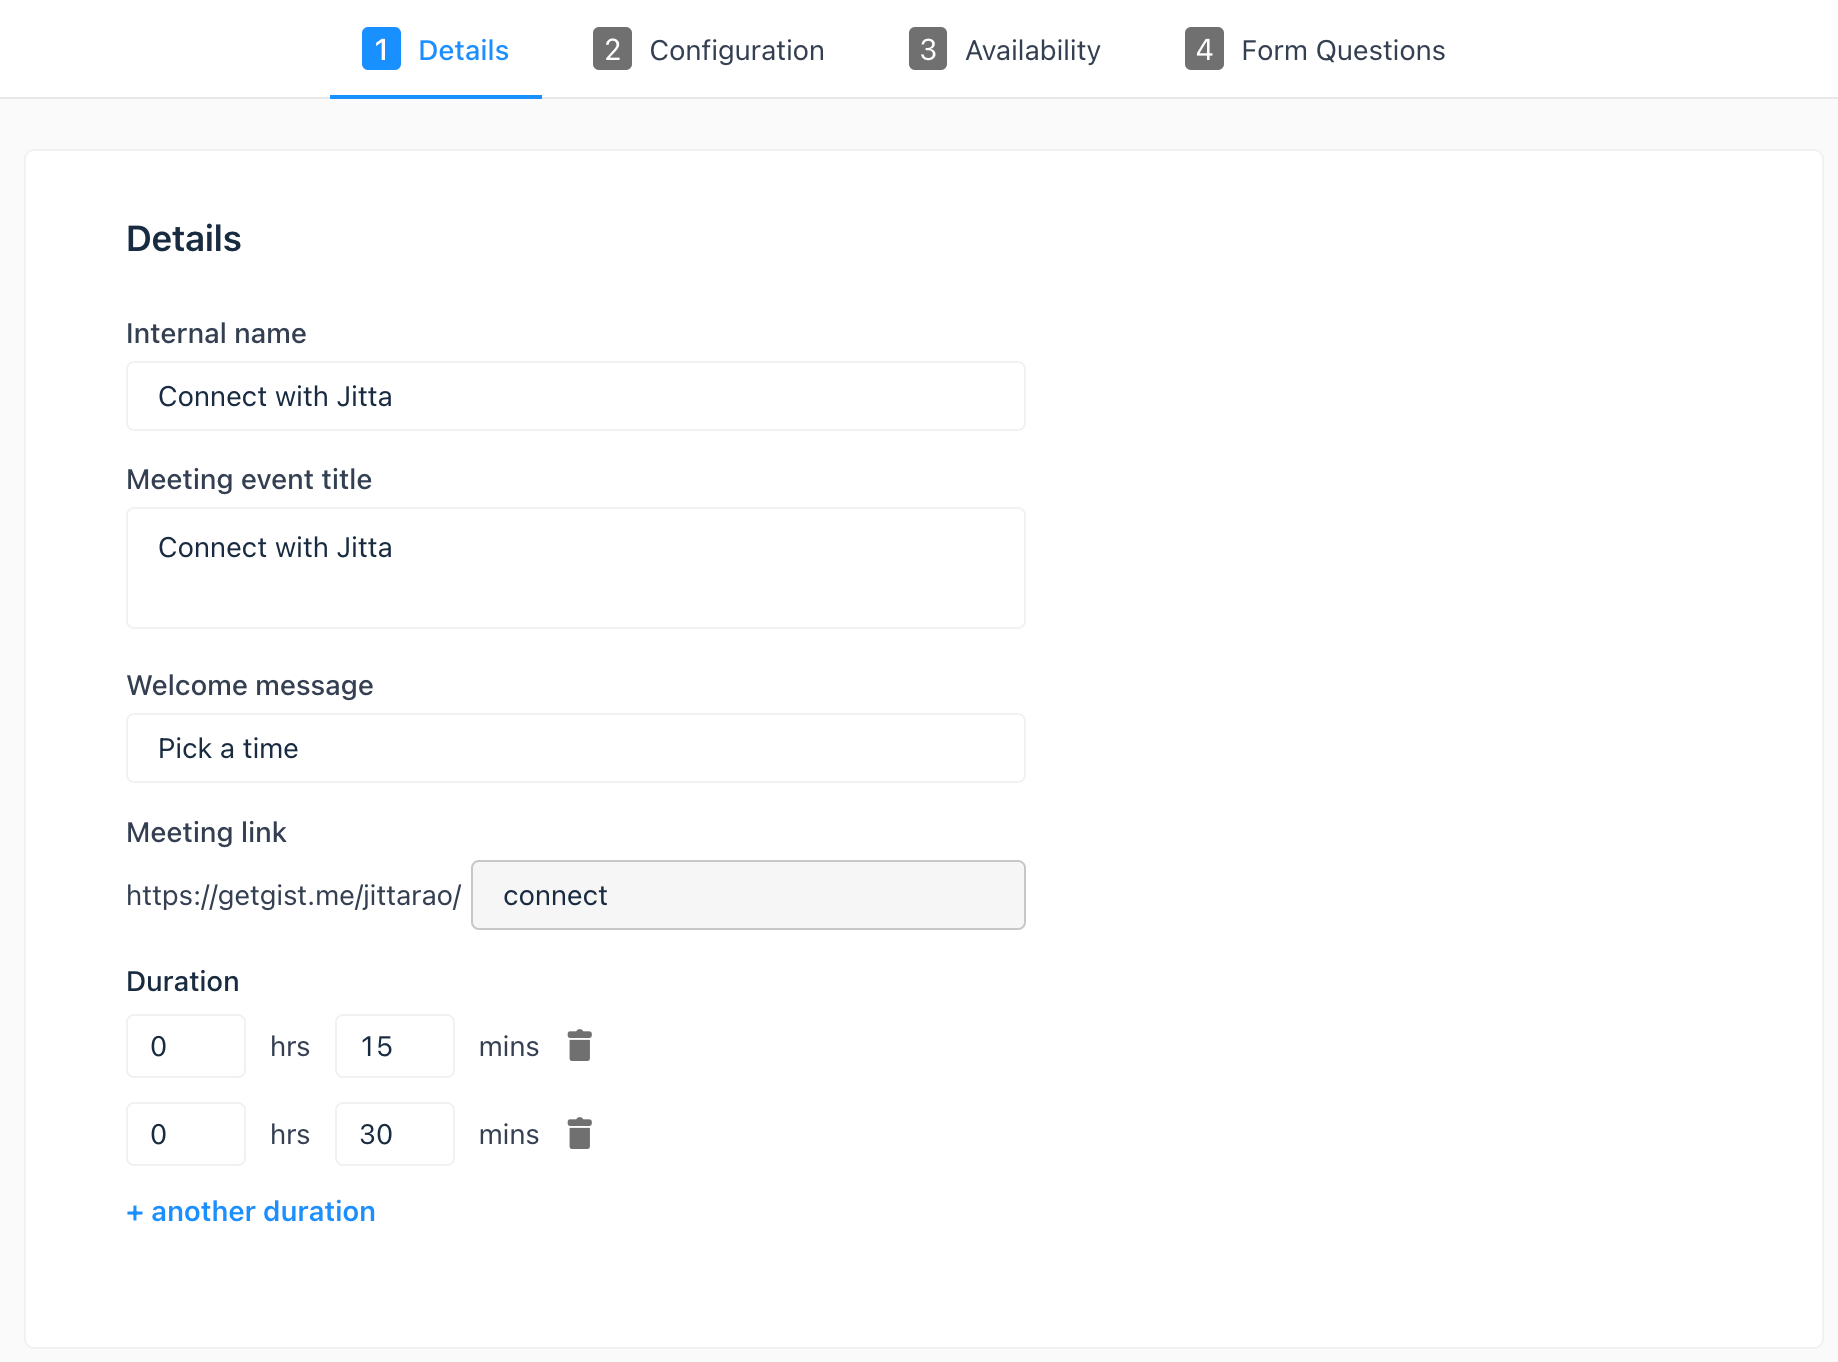
Details
On the Details page, edit the meeting link's basic information.
Internal name: the name that appears when the meeting link used to access the meeting link is added to an email.
Meeting Event Title: the name of the calendar event you share with your contact. For example, "Product Demo" would appear as event name. You can insert personalization tokens in the subject by clicking Contact dropdown.
Welcome message: a short text that appears on your meeting link to inform your visitors what's the meeting about.
Meeting URL: This is the link that contacts will use to book meetings on your calendar, and it cannot be edited after the link is created.
Duration: the length of time visitors can book you for. Click + Add duration to add more options.
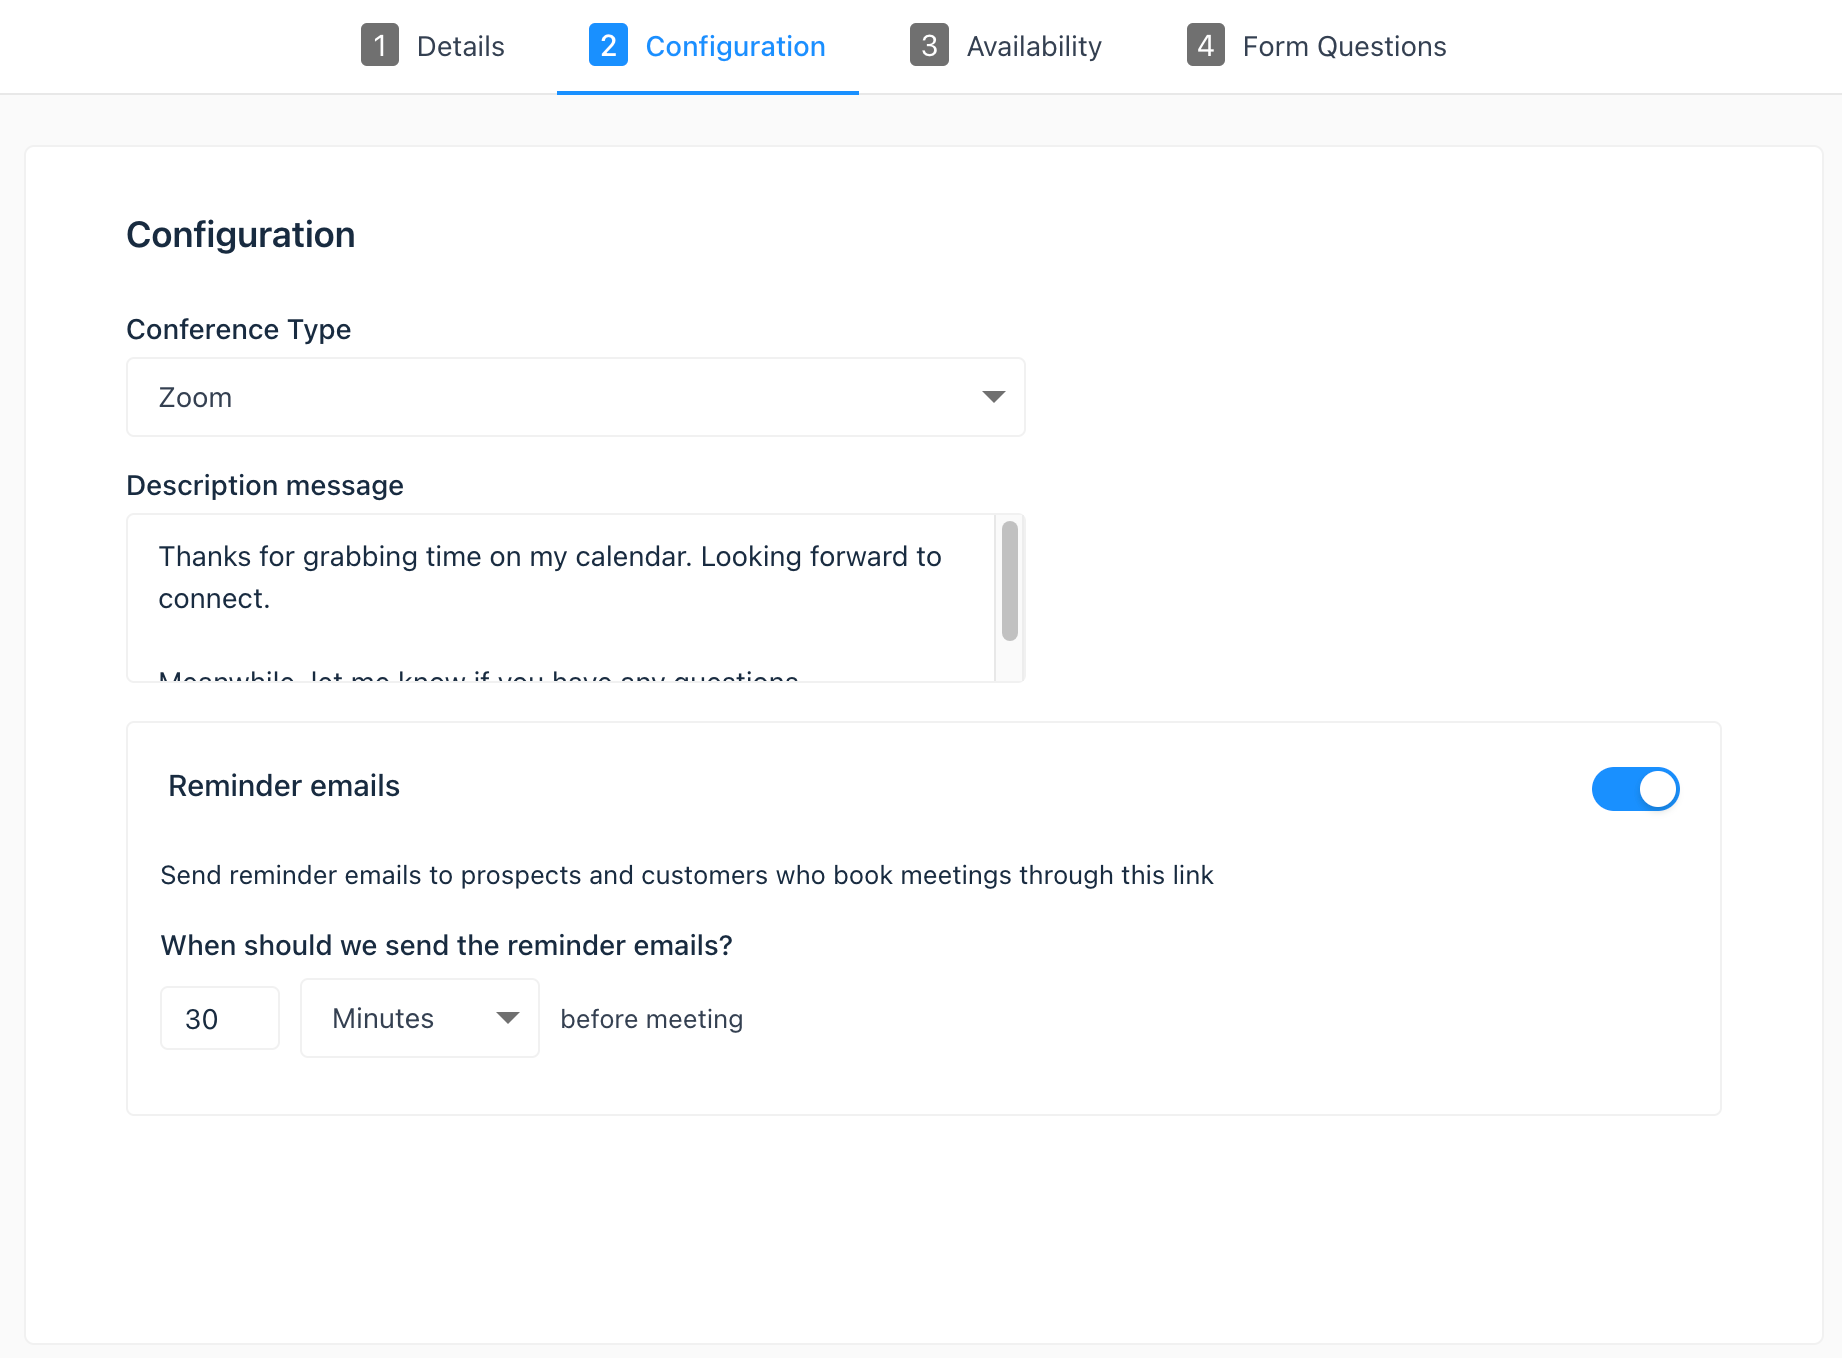
Configuration
Location: include information about how and where you will connect with your meeting attendee. This can be a call-in link, a physical location, etc. This location will appear in the contact's calendar invite, and the event created on your default personal calendar.
Add videoconference link: if you're using Gist's integration with Zoom, or Google Meet, you can add a videoconference link. If you have not set up a videoconference integration, you will not see this option.
Description: a description of the meeting that appears in the invite when a meeting is booked. This description will appear in the calendar invite your contact receives and the event created on your default personal calendar.
Reminder emails: To send reminder emails before a meeting, click to toggle the "Reminder emails" switch on.
To select how many days, hours, or minutes before the meeting that an email should be sent out, enter a number in the text field, then click the email dropdown menu and select a time measure.
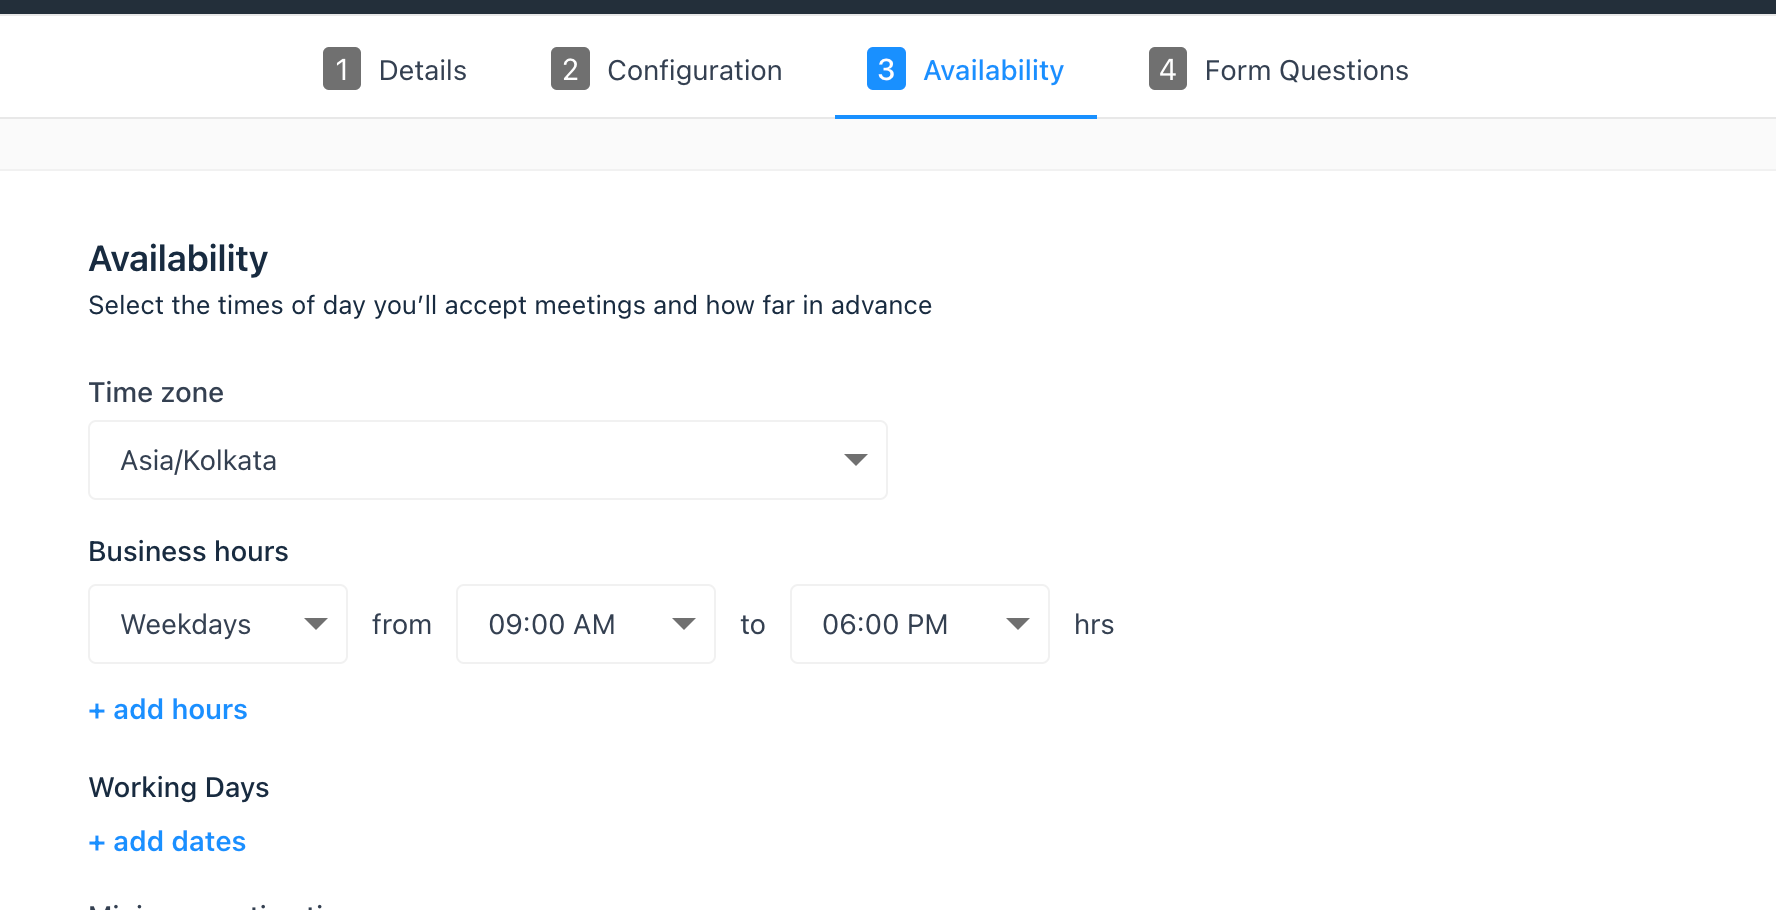
Step 5: Set your availability
To understand when you can accept new meetings, Gist looks at your availability from two main places:
- Your connected calendar, like Google, Outlook, etc.
- Your Gist schedule, which you’ll set up in this step
Timezone: click the Time zone dropdown menu and select your time zone. This is the time zone that your availability is based on.
Available times: use the dropdown menus to set the days of the week and duration of your available time slots. Click + Add hours to add additional time slots.
Step 6: Share your link
After you create a scheduling page, you can share it with your contacts using a meeting link. The meeting link will allow the contact to access your scheduling page so they can book time with you. When you connect your calendar, booked meetings will sync with your connected Gmail or Office 365 calendar so your appointments will always be up-to-date.
You can share the meeting link directly with the contact in an email or live chat message, or add it to a CTA on your website.
- Navigate to Sales > Meetings.
- Hover over the meeting name and click Copy link.
- Share the link with your contact.
Need Help?
If you have any further questions, please start a Live Chat. Just "Click" on the Chat Icon in the lower right corner to talk with our support team.